For most of its life, OpenClaw has been a single agent. One brain, one context, one conversation. You tell it to do something, it does it. That model works brilliantly for straightforward tasks — sending a message, summarizing a document, checking the weather. But the moment you throw a genuinely complex workflow at a single agent, the cracks start to show.
Ask one agent to research a topic, write a report, fact-check its own claims, format the output, and email it to three people — and you are asking it to context-switch repeatedly, hold an enormous amount of state in memory, and be both the author and the critic. The quality degrades. Details slip through. The agent forgets what it was doing midway through step four.
The February 16, 2026 update changes this fundamentally. OpenClaw now supports nested sub-agents — the ability for a top-level manager agent to spawn specialized child agents, each with their own isolated context, tools, and memory. Combined with the new Lobster Workflow Engine, you can build deterministic multi-agent pipelines where a coordinated team of AI agents collaborates on complex work, just like a real team of people would.
This guide explains how it works, how to set it up, and how to design effective multi-agent workflows.
What Are Nested Sub-Agents?
In previous versions of OpenClaw, you could spawn simple sub-agents using sessions_spawn, but the implementation was limited. Flow control was non-deterministic, nesting was shallow (one level deep), and sub-agents shared context in ways that could cause interference between tasks.
The new nested sub-agent system is a complete redesign. Here is what changed:
- Configurable nesting depth: You can now set
maxSpawnDepthto control how many layers deep sub-agents can go. A depth of 2 means your manager can spawn a sub-agent, which can spawn its own sub-sub-agent. A depth of 3 adds another layer — and so on. - Isolated sessions: Each sub-agent runs in its own isolated session with a separate context window, memory, and tool set. A research sub-agent cannot accidentally overwrite a coding sub-agent's workspace.
- Structured communication: Sub-agents report results back to their parent through a defined interface, not by dumping text into a shared context. The parent receives a structured result object it can inspect, route, and act on.
- Scoped tool access: You can configure exactly which tools and skills each sub-agent has access to. A research agent gets browser access. A coding agent gets file system access. A review agent gets read-only access. No agent gets more than it needs.
The Orchestrator Pattern
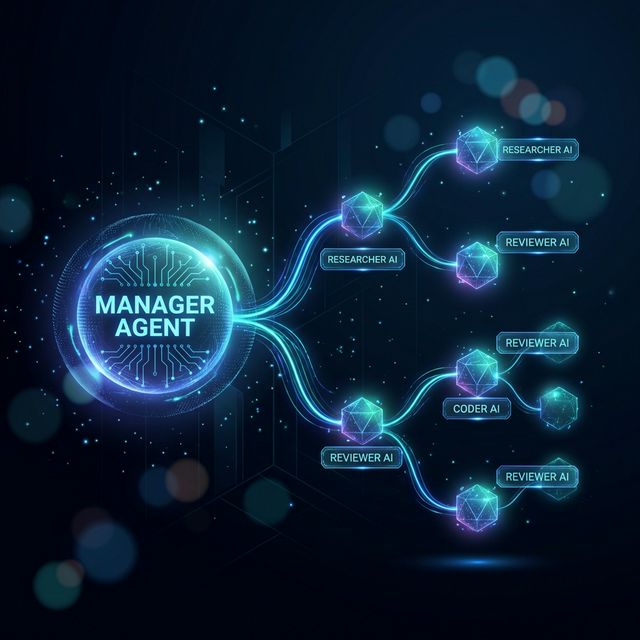
The most powerful way to use nested sub-agents is the orchestrator pattern. You designate one agent as the manager — it receives the task, breaks it into subtasks, delegates each subtask to a specialized sub-agent, collects the results, and assembles the final output.
Think of it like a project manager who never writes code themselves but knows exactly who to assign each piece of work to, reviews what comes back, and ensures the final deliverable is cohesive.
What Is the Lobster Workflow Engine?
Lobster is OpenClaw's built-in workflow engine for defining deterministic multi-agent pipelines. While sub-agents give you the ability to delegate, Lobster gives you the ability to orchestrate — to define exactly what happens in what order, with what inputs, and under what conditions.
Before Lobster, multi-agent workflows in OpenClaw were ad-hoc. You would tell the manager agent what to do in natural language and hope it figured out the right sequence. Sometimes it did. Sometimes it ran steps out of order, skipped validation, or forgot to pass output from one step to the next.
Lobster replaces hope with structure. A Lobster workflow is a YAML file that defines:
- Steps: The individual tasks to execute, in order
- Agents: Which agent (or sub-agent) handles each step
- Inputs and outputs: What data flows between steps
- Conditions: When to skip, retry, or branch
- Loops: The new "sub-lobster steps" feature supports iteration — repeat a step for each item in a list
Here is a simple example:
# ~/.openclaw/workflows/content-pipeline.yaml
name: "Content Research and Writing Pipeline"
description: "Research a topic, write an article, review it, and publish"

steps:
  - name: "research"
    agent: "researcher"
    action: "deep_research"
    inputs:
      topic: "{{ trigger.topic }}"
      depth: "comprehensive"
      max_sources: 10
    outputs:
      - research_report
      - source_list

  - name: "write"
    agent: "writer"
    action: "write_article"
    inputs:
      research: "{{ steps.research.research_report }}"
      sources: "{{ steps.research.source_list }}"
      style: "informative, engaging"
      min_words: 1200
    outputs:
      - draft_article

  - name: "review"
    agent: "reviewer"
    action: "review_content"
    inputs:
      article: "{{ steps.write.draft_article }}"
      original_research: "{{ steps.research.research_report }}"
    checks:
      - factual_accuracy
      - grammar_and_style
      - source_attribution
    outputs:
      - review_result
      - revision_notes

  - name: "revise"
    agent: "writer"
    action: "revise_article"
    condition: "{{ steps.review.review_result != 'approved' }}"
    inputs:
      draft: "{{ steps.write.draft_article }}"
      notes: "{{ steps.review.revision_notes }}"
    outputs:
      - final_article

  - name: "publish"
    agent: "manager"
    action: "publish_content"
    inputs:
      article: "{{ steps.revise.final_article || steps.write.draft_article }}"
    requires_approval: true
This workflow defines a five-step pipeline with four different agents. The writer only writes. The reviewer only reviews. The manager only handles publishing. And the conditional revise step only runs if the reviewer flags issues. This is deterministic, repeatable, and auditable.
Setting Up Your First Multi-Agent Team
Step 1: Update OpenClaw
Make sure you are running the February 2026 update or later:
openclaw update
openclaw version
# Should show v2026.2.16 or later
Step 2: Define Your Agents
Open your OpenClaw configuration and define the agents you want in your team:
# ~/.openclaw/config.yaml

agents:
  manager:
    role: "orchestrator"
    model: "claude-3-5-sonnet"
    description: "Coordinates tasks, delegates to sub-agents, assembles results"
    maxSpawnDepth: 2
    tools:
      - messaging
      - workflow_runner
      - file_manager

  researcher:
    role: "sub-agent"
    model: "claude-3-5-sonnet"
    description: "Deep research specialist — web browsing, data gathering, source verification"
    tools:
      - browser
      - search
      - note_taking
    boundaries:
      writable: ["~/research/**"]
      forbidden: ["~/.openclaw/credentials/**"]

  coder:
    role: "sub-agent"
    model: "gemini-3-flash"
    description: "Software development — writes, tests, and debugs code"
    tools:
      - file_manager
      - terminal
      - code_runner
    boundaries:
      writable: ["~/projects/**"]
      forbidden: ["~/.ssh/**", "~/.env"]

  reviewer:
    role: "sub-agent"
    model: "opus-4.5"
    description: "Quality assurance — reviews research accuracy, code quality, and content"
    tools:
      - file_reader    # read-only, cannot modify files
      - browser        # for fact-checking
    boundaries:
      writable: []     # reviewer cannot write to any files
Notice how each agent has a specific model, specific tools, and specific boundaries. The researcher can browse the web but cannot touch your credentials. The coder can modify project files but not your SSH keys. The reviewer cannot write to any files — it only reads and reports.
Step 3: Configure Agent Routing
Tell OpenClaw how to route messages and tasks to the right agent:
# ~/.openclaw/config.yaml (continued)

routing:
  default_agent: "manager"        # All inbound messages go to the manager
  bindings:
    whatsapp: "manager"           # WhatsApp messages → manager
    telegram: "manager"           # Telegram messages → manager
    slack:
      "#dev": "coder"             # Slack #dev channel → coder directly
      "#research": "researcher"   # Slack #research → researcher directly
      "*": "manager"              # Everything else → manager
This routing configuration means that most messages go through the manager, which then delegates as needed. But you can also create direct channels — if you post in your Slack #dev channel, the coder agent picks it up directly without the manager as an intermediary.
Step 4: Create a Lobster Workflow
Create your first workflow file:
mkdir -p ~/.openclaw/workflows
nano ~/.openclaw/workflows/bug-fix-pipeline.yaml
Here is a practical example — an automated bug-fix pipeline:
name: "Automated Bug Fix Pipeline"
description: "Reproduce, diagnose, fix, and verify a reported bug"

trigger:
  type: "manual"   # Can also be "github_issue" or "scheduled"

steps:
  - name: "reproduce"
    agent: "coder"
    action: "write_reproduction_test"
    inputs:
      bug_report: "{{ trigger.description }}"
      repo: "{{ trigger.repo }}"
    outputs:
      - reproduction_test
      - reproduction_result

  - name: "diagnose"
    agent: "coder"
    action: "diagnose_root_cause"
    inputs:
      test: "{{ steps.reproduce.reproduction_test }}"
      result: "{{ steps.reproduce.reproduction_result }}"
    outputs:
      - diagnosis
      - affected_files

  - name: "fix"
    agent: "coder"
    action: "implement_fix"
    inputs:
      diagnosis: "{{ steps.diagnose.diagnosis }}"
      files: "{{ steps.diagnose.affected_files }}"
    outputs:
      - patch
      - changed_files

  - name: "review_fix"
    agent: "reviewer"
    action: "code_review"
    inputs:
      patch: "{{ steps.fix.patch }}"
      original_diagnosis: "{{ steps.diagnose.diagnosis }}"
    checks:
      - correctness
      - regression_risk
      - code_style
    outputs:
      - review_verdict
      - review_comments

  - name: "run_tests"
    agent: "coder"
    action: "run_full_test_suite"
    condition: "{{ steps.review_fix.review_verdict == 'approved' }}"
    inputs:
      repo: "{{ trigger.repo }}"
    outputs:
      - test_results
      - all_passing

  - name: "report"
    agent: "manager"
    action: "send_summary"
    inputs:
      diagnosis: "{{ steps.diagnose.diagnosis }}"
      fix: "{{ steps.fix.patch }}"
      review: "{{ steps.review_fix.review_comments }}"
      tests: "{{ steps.run_tests.test_results }}"
      success: "{{ steps.run_tests.all_passing }}"
Step 5: Run the Workflow
Trigger your workflow from any connected interface:
You: "Run the bug-fix pipeline for the login timeout issue
     in myorg/backend-api"
Or trigger it directly from the command line:
openclaw workflow run bug-fix-pipeline \
  --description "Users are experiencing 504 timeouts on the login endpoint after the v2.3 deploy" \
  --repo "myorg/backend-api"
OpenClaw's manager agent receives the command, loads the Lobster workflow, and begins executing steps in sequence. You will receive progress updates as each step completes, and a final summary when the pipeline finishes.
Sub-Lobster Steps: Loops and Iteration
One of the most powerful features of Lobster is sub-lobster steps — the ability to loop over a list and execute a step for each item. This is essential for batch processing:
  - name: "review_each_file"
    agent: "reviewer"
    action: "review_file"
    loop: "{{ steps.fix.changed_files }}"
    inputs:
      file: "{{ item }}"
      context: "{{ steps.diagnose.diagnosis }}"
    outputs:
      - file_review
This step runs once for each file in the changed_files list. The reviewer agent gets a fresh context for each file, preventing context contamination between reviews. The results are collected into an array that subsequent steps can access.
Design Principles for Effective Multi-Agent Teams
After extensive testing and community feedback, several patterns have emerged for designing effective multi-agent workflows:
Keep agents focused. Each agent should have one clear responsibility. A research agent researches. A coding agent codes. When you give an agent too many responsibilities, it starts making the same context-switching mistakes a single monolithic agent would.
Use the reviewer pattern. Always include a review step with a separate agent. The agent that produced the work should never be the one reviewing it. This mirrors how human teams work — code authors do not review their own pull requests.
Minimize tool overlap. If two agents both have write access to the same directory, you are inviting conflicts. Design your boundaries so that agents operate in separate workspaces, or use a sequential workflow where only one agent writes at a time.
Start with depth 2. A nesting depth of 2 (manager → sub-agent → sub-sub-agent) is sufficient for most workflows. Going deeper adds complexity without proportional benefit. Increase depth only when you have a genuine need for hierarchical delegation.
Log everything. Enable workflow_logging: verbose in your Lobster configuration. When a multi-agent pipeline produces unexpected results, the logs are your primary debugging tool. Each step records its inputs, outputs, timing, and any errors.
Require approval on sensitive steps. Use requires_approval: true on any step that has real-world side effects — publishing content, pushing code, sending emails, or modifying production systems. Let the agents handle the creative and analytical work autonomously, but keep a human in the loop for irreversible actions.
Monitoring Your Agent Team
OpenClaw provides several ways to monitor multi-agent workflows in progress:
# View active workflows
openclaw workflow status

# View detailed step-by-step progress
openclaw workflow status bug-fix-pipeline --verbose

# View agent activity across all sessions
openclaw agents status

# View the logs for a specific workflow run
openclaw workflow logs bug-fix-pipeline --run-id latest
For teams running OpenClaw in production, the community has developed OpenClaw Mission Control — a web-based dashboard that provides real-time visibility into all active agents, running workflows, pending approvals, and resource usage. You can find it on ClawHub under the mission-control skill.
Conclusion
Nested sub-agents and the Lobster Workflow Engine represent the biggest architectural leap OpenClaw has made since its original release. The shift from a single-agent model to a coordinated multi-agent team is not just a feature — it is a fundamental change in what is possible.
A single agent is an assistant. A team of agents, properly orchestrated, is a workforce.
The setup takes 15 minutes. Start with a simple two-agent pipeline — a worker and a reviewer. See how the quality of output improves when the agent that does the work is not the same agent that checks the work. Then add more agents, more steps, more conditions. Build pipelines that match how your real workflows operate.
The tools are here. The framework is solid. The only question is what you will build with it.