In our budget hardware guide, we showed you how a single Raspberry Pi 5 can run OpenClaw with a small local model. It works. It is slow but functional — good enough for background tasks like email triage, file organization, and scheduled reporting.
But what if you want more?
Not more speed from a single board — that is a hardware limitation. More capacity. More tasks running simultaneously. More resilience. The ability to dedicate one node to email management, another to code review, another to research, and a fourth to monitoring and coordination.
Welcome to the OpenClaw Swarm: a multi-node agent cluster built from consumer hardware. This guide walks you through building a 4-node Raspberry Pi cluster that runs OpenClaw as a distributed system — with shared memory, task distribution, automatic failover, and a total cost under $500.
Why Cluster?
Before we get into the build, let's address the obvious question: why not just buy one powerful machine?
Cost Per Node
A Raspberry Pi 5 (8GB) costs roughly $80 including a case and power supply. Four nodes cost $320. A Mac Mini M4 with 24GB costs $700. The cluster is cheaper and more capable in several ways.
Parallel Task Execution
A single-node OpenClaw agent is inherently sequential for CPU-bound tasks. While it can queue and schedule tasks, it can only run one LLM inference at a time. A 4-node cluster runs four inferences simultaneously — quadrupling your throughput for batch workloads.
Fault Tolerance
If your single Mac Mini crashes, your agent is down. In a cluster, if one node fails, the remaining three continue working. The failed node's tasks are automatically redistributed. Your agent swarm is resilient.
Specialization
Each node can run a different model optimized for a specific task type. Node 1 runs a coding model. Node 2 runs a general reasoning model. Node 3 runs a fast model for quick classifications. Node 4 runs the coordinator. Each node excels at its specialty.
The Hobby Factor
Let's be honest — building a Pi cluster is fun. There is something deeply satisfying about assembling physical hardware, watching LEDs blink, and knowing that your personal AI infrastructure is running on a stack of credit-card-sized computers on your desk.
The Shopping List
Here is everything you need for a 4-node cluster:
| Component | Qty | Unit Price | Total |
|---|---|---|---|
| Raspberry Pi 5 (8GB) | 4 | $80 | $320 |
| Cluster Case (stackable, with fans) | 1 | $30 | $30 |
| USB-C Power Supply (27W per Pi) | 4 | $12 | $48 |
| MicroSD Card (64GB, A2 class) | 4 | $12 | $48 |
| Ethernet Switch (5-port Gigabit) | 1 | $20 | $20 |
| Cat6 Ethernet Cables (30cm) | 4 | $3 | $12 |
| Total | $478 |
Optional but recommended:
- NVMe SSD HATs + drives for faster model loading (~$40 per node)
- A small HDMI monitor for the coordinator node ($60)
- A USB keyboard for initial setup ($15)
Physical Assembly
Step 1: Flash the Operating System
Flash Raspberry Pi OS (64-bit Lite) onto each MicroSD card using the Raspberry Pi Imager. During imaging, pre-configure:
- Hostname: Set each node to
claw-node-1,claw-node-2,claw-node-3,claw-node-4 - SSH: Enable SSH with your public key
- Wi-Fi: Skip — we use Ethernet for reliability and speed
- User: Create user
openclawwith a strong password
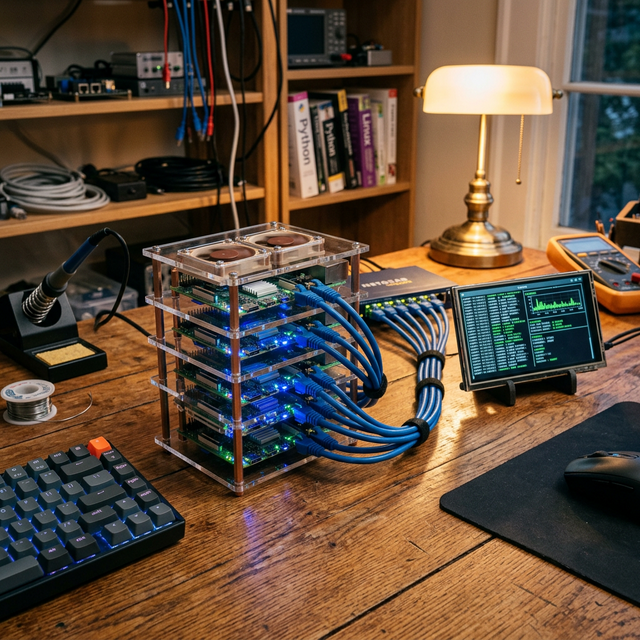
Step 2: Assemble the Stack
Mount each Pi into the cluster case. Connect the active cooling fans. Route the Ethernet cables to the switch. Plug in the power supplies.
Your desk should now have a tidy stack of four Pis, an Ethernet switch, and a satisfying amount of blinking LEDs.
Step 3: Network Configuration
Boot all four nodes. Assign static IPs via your router or directly in /etc/dhcpcd.conf:
# On each node, set a static IP
sudo nano /etc/dhcpcd.conf

# Add:
interface eth0
static ip_address=192.168.1.101/24    # .101, .102, .103, .104 for each node
static routers=192.168.1.1
static domain_name_servers=192.168.1.1
Verify all nodes can ping each other:
# From node 1:
ping claw-node-2.local
ping claw-node-3.local
ping claw-node-4.local
Software Setup
Step 1: Install OpenClaw on All Nodes
SSH into each node and install:
# On each node:
sudo apt update && sudo apt upgrade -y
curl -fsSL https://deb.nodesource.com/setup_22.x | sudo -E bash -
sudo apt install -y nodejs git
sudo npm install -g openclaw
Step 2: Install Ollama on Each Node
curl -fsSL https://ollama.com/install.sh | sh
Step 3: Download Models per Node
This is where specialization begins. Each node gets a model suited to its role:
# Node 1 (General Reasoning)
ollama pull gemma2:9b-instruct-q4_K_M

# Node 2 (Coding)
ollama pull deepseek-coder-v2:16b-lite-instruct-q4_K_M

# Node 3 (Fast Tasks — classification, triage, formatting)
ollama pull phi4-mini:3.8b-q4_K_M

# Node 4 (Coordinator — runs OpenClaw's orchestration layer)
ollama pull phi4-mini:3.8b-q4_K_M
Note on 8GB RAM: The Pi 5 with 8GB can comfortably run quantized models up to 7–9B parameters. The 16B coding model will run but will use swap — acceptable for a dedicated coding node where speed is less critical than quality.
Configuring the Swarm
The Coordinator Pattern
In a swarm, one node is the Coordinator and the others are Workers. The Coordinator runs the main OpenClaw agent, manages memory, receives messages, and dispatches tasks. Workers receive tasks, run inference, and return results.
Coordinator Configuration (Node 4)
# On claw-node-4: ~/.openclaw/config.yaml

swarm:
  role: "coordinator"
  node_id: "claw-node-4"

  workers:
    - id: "claw-node-1"
      address: "192.168.1.101:8421"
      capabilities: ["general", "research", "writing"]
      model: "gemma2:9b"

    - id: "claw-node-2"
      address: "192.168.1.102:8421"
      capabilities: ["coding", "debugging", "review"]
      model: "deepseek-coder-v2:16b"

    - id: "claw-node-3"
      address: "192.168.1.103:8421"
      capabilities: ["classification", "triage", "formatting"]
      model: "phi4-mini:3.8b"

  task_routing:
    strategy: "capability_match"    # Route tasks to most capable node
    fallback: "round_robin"         # If no capability match, distribute evenly

  memory:
    shared: true
    sync_interval: "30s"            # Sync QMD blocks across nodes
    primary_store: "claw-node-4"    # Coordinator is source of truth

  health:
    check_interval: "10s"
    failover: true                  # Redistribute tasks if a node goes down
    restart_attempts: 3
Worker Configuration (Nodes 1–3)
# On each worker node: ~/.openclaw/config.yaml

swarm:
  role: "worker"
  node_id: "claw-node-1"           # Unique per node
  coordinator: "192.168.1.104:8421"

  worker:
    port: 8421
    max_concurrent_tasks: 2         # 2 tasks at a time per node
    heartbeat_interval: "5s"

model:
  provider: "ollama"
  base_url: "http://localhost:11434"
Start the Swarm
# On each worker (nodes 1-3):
openclaw swarm worker start

# On the coordinator (node 4):
openclaw swarm coordinator start

# Verify the swarm:
openclaw swarm status
Expected output:
🐝 OpenClaw Swarm — Status

Coordinator: claw-node-4 (192.168.1.104) 🟢 Online
  Uptime: 2h 14m
  Tasks dispatched: 47
  Memory blocks: 312

Workers:
  claw-node-1 (General)    🟢 Online  |  Load: 40%  |  Tasks: 2/2
  claw-node-2 (Coding)     🟢 Online  |  Load: 25%  |  Tasks: 1/2
  claw-node-3 (Fast Tasks) 🟢 Online  |  Load: 60%  |  Tasks: 2/2

Cluster throughput: ~8.2 tasks/minute
Total tokens processed today: 142,847
Real-World Swarm Performance
Let us compare a single Pi 5 against a 4-node swarm for a realistic batch workload: processing a morning inbox with 20 emails that need triage, 5 that need draft replies, and 3 research tasks.
| Metric | Single Pi 5 | 4-Node Swarm |
|---|---|---|
| Email triage (20 emails) | ~40 minutes | ~10 minutes |
| Draft replies (5 emails) | ~25 minutes | ~8 minutes |
| Research tasks (3) | ~45 minutes | ~15 minutes |
| Total | ~110 minutes | ~33 minutes |
The swarm is roughly 3.3x faster — not 4x because of coordination overhead and the fact that some tasks are sequential by nature. Still, the difference between a two-hour morning routine and a half-hour routine is game-changing.
Advanced: Dynamic Scaling
The swarm does not have to be fixed at four nodes. You can add and remove nodes dynamically:
# Add a new node to the swarm
openclaw swarm worker join --coordinator 192.168.1.104:8421

# Remove a node gracefully (finishes current tasks first)
openclaw swarm worker leave --graceful

# The coordinator automatically rebalances
This means you can start with two Pis and add more as your workload grows. Or temporarily add your laptop to the swarm when you need extra horsepower for a big batch job.
Monitoring Your Swarm
The coordinator includes a built-in web dashboard for swarm monitoring:
# On the coordinator
dashboard:
  enabled: true
  port: 8420
  features:
    swarm_view: true             # Cluster topology and health
    task_distribution: true      # See which tasks go to which nodes
    node_metrics: true           # CPU, RAM, temperature per node
The swarm dashboard shows a real-time topology view of your cluster, with each node's current task, load, temperature, and model. You can manually reassign tasks, restart individual nodes, or trigger a cluster-wide model update from the dashboard.
Conclusion
A Raspberry Pi cluster running OpenClaw is not enterprise infrastructure. It is not going to compete with an M4 Max Mac Studio for raw model performance. But that is not the point.
The point is distributed, resilient, parallel task execution at consumer prices. Four specialized nodes working together outperform a single general-purpose node in throughput, reliability, and flexibility. And a cluster running silently on your bookshelf, consuming less power than a desk lamp, has an elegance that a loud desktop PC never will.
Build it over a weekend. Start with two nodes. Add more as you find new tasks to automate. And enjoy the deeply satisfying experience of watching a swarm of tiny computers work together to handle your life's administration.
Your personal AI is no longer a single machine. It is a hive.